

The All Blacks of the last two years have not been the All Blacks we know. They have been fallible. Beatable. You’d have to go back to the late 90s and early 2000s to find a reference for the last time the All Blacks have looked this fragile. Between 1998 and 200o, the All Blacks lost 11 of their 29 games. That’s a 37% loss rate across two years. You’d have to count up to 2007 from 2001 to count their next 11 losses to put that losing spin into context.
In the last two test seasons between 2021 and 2022, the All Blacks have played 28 games and lost 7. That’s a loss rate of 25% but it included an almost unheard of three home losses. To put it into context, they lost more games in New Zealand in 2022 alone than they did in the entire 2010s. An entire decade.
The last time Ireland encountered the All Blacks we did something that would have sounded like drunken delusions in the mid to late 2000s.
We beat them.
In a three-game series.
In New Zealand.

That was a weird series in that New Zealand’s win in the first test seemed like it flattered them. Ireland didn’t play all that badly but lost the game in a weird second-quarter spell where every error seemed to lead to seven points for the All Blacks.
My reading of that first test defeat was wrong in that I felt that we needed to get more playmakers on the field – a second #10, essentially – but my understanding of counter-transition was not yet complete. We didn’t need another “playmaker” because Ireland are the counter-transition team. We needed a long, accurate kicker in the backline first and foremost and the structure would take of itself, and so it would prove. In Keenan, Lowe, Hansen and Sexton we had all the pieces we needed to make it work for us – no “second #10” required.
By the end of the series, the All Blacks were even trying their own version of counter-transition but they didn’t have the back five or the variety of kickers they needed in the backfield to make it work successfully. The All Blacks never stay on a downswing for long, however, so it was only a matter of time before they started to make counter-transition work for them.
When they beat the Springboks in the Rugby Championship two weeks ago, they did it by playing pure counter-transition rugby from the start.
Before we get into that, we need to understand some base things about Counter-Transition Rugby. I went into this in some detail in this article earlier in the week but I can add a little bit more detail.
At a base level, Counter Transition rugby looks to create controlled chaos by attacking the opposition’s return of a ball you’ve kicked to them, with a B-side aim of encouraging the opponent to give you lineout possession. This produces three immediate role-set requirements outside of the usual solid scrum and top-level half-backs every elite side needs as a standard;
- At least two high-level kickers in your outside backline (ideally three) as part of your backfield rotation on defensive sequences. These kickers need to be able to find the 5m tramlines at 40/50m range from a variety of kicking positions – in the pocket, off a second pass and in deep backfield cover. They have to balance that with really good decision-making on when to kick, where to kick and if running back to start a transition phase sequence is required. Your halfbacks will manage all of this as the plays develop.
- A pack – specifically a back five – that can beat the opposition forwards in the race to defensive position or offensive alignment with the capacity to run highly scripted screen play “automations” when you have transition possession. Automation is where you’re running in highly drilled, highly rehearsed phase play units where passing options and decisions are almost run on autopilot. Defensively, your back five and midfield have to be capable of physically stopping the
- A highly efficient offensive and defensive lineout and maul with a highly scripted package of plays you can use directly off the lineout, maul feint or driven maul to advance your position up the field when the opponent bails out of our kicking game by kicking to touch.
When you have these three squad roles nailed down, you’ll scare the life out of any team that isn’t built to kill Counter Transition rugby – which is most teams.
Against the Springboks two weeks ago, the All Blacks demonstrated all of these rolesets with the type of high volume, long-distance kicking in long sequences that mark out Counter Transition teams.
In 2022, the All Blacks didn’t have the personnel to play this style and they were beset by conceptual problems – namely getting Scott Barrett into the team for a three-lock pack to offset their concerns about the lineout and getting beaten up close in.
You cannot play effective counter-transition rugby with a three-lock pack.
It might be possible with a unicorn half-lock – Beirne, Ryan Baird potentially and Maro Itoje, guys like that – but for most of the second rows who might get selected there, it creates a drag on the system that is not easily counterbalanced. Counter Transition rugby is built on being more mobile than the opposition in the back five and midfield – ideally with your hooker helping balance the books – and if you’re not, you can’t run the system effectively.
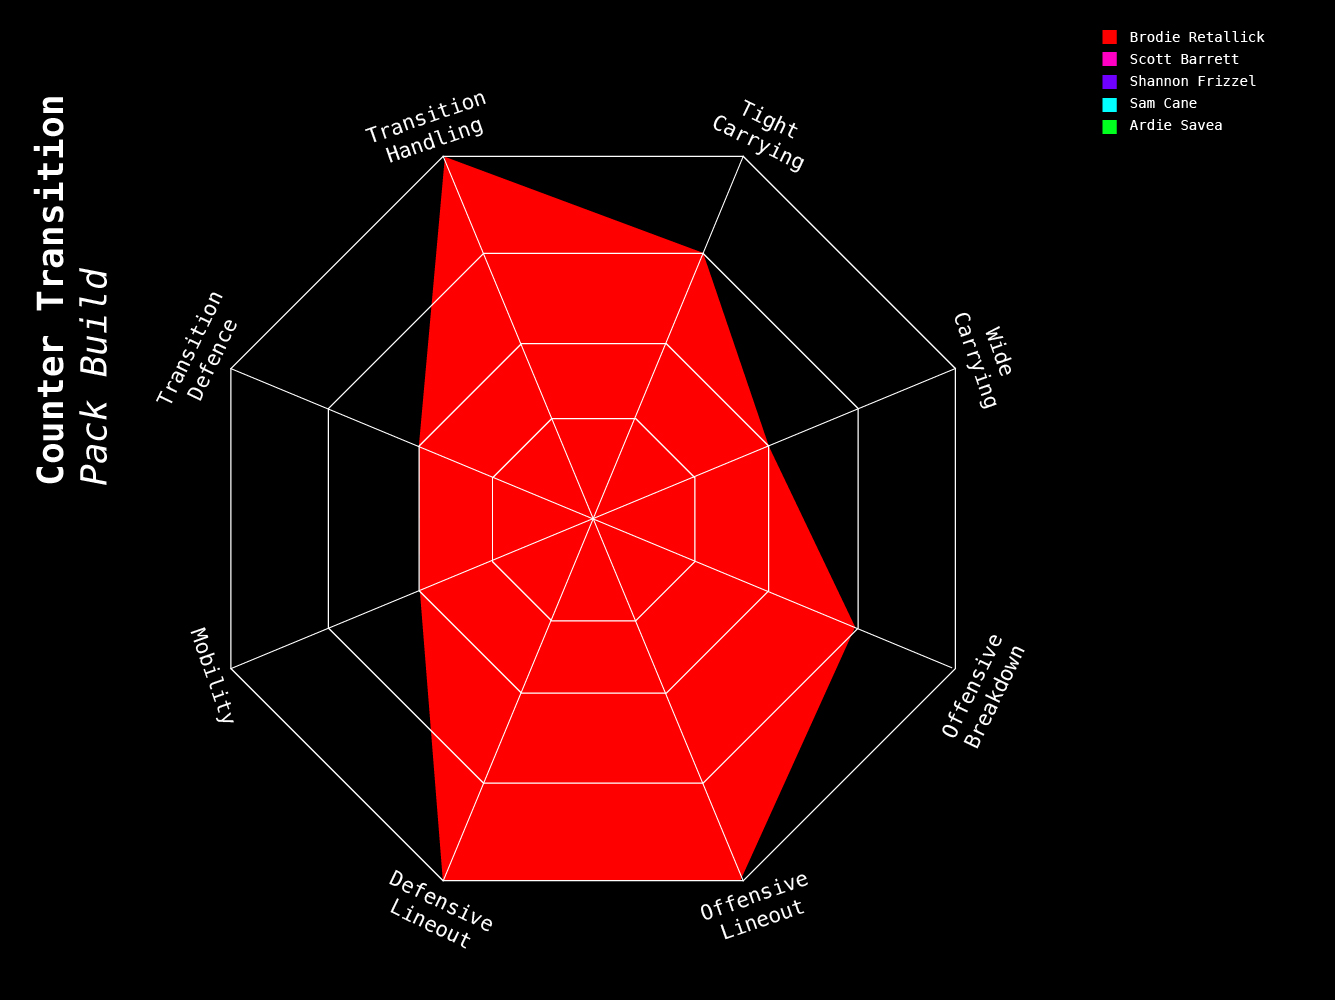


When we combine these radars together what do we get? Really good coverage. Especially on the top end of the radar on transition defence, handling, wide carrying, mobility and offensive breakdown – all good counter transition markers.

They’re a little light on the lineout side of the chart but that’s a side effect of not having any effective lineout dominant combo flankers available to them at the moment – Luke Jacobsen aside.
Barrett and Retallick take on an outsized responsibility at the lineout in this build but Retallick, in particular, is more than capable of it and combines that super-strength with good carrying, passing and offensive breakdown output.
I think they’re a better combination for the All Blacks than anything involved Sam Whitelock at the moment, as good a player as he has been.
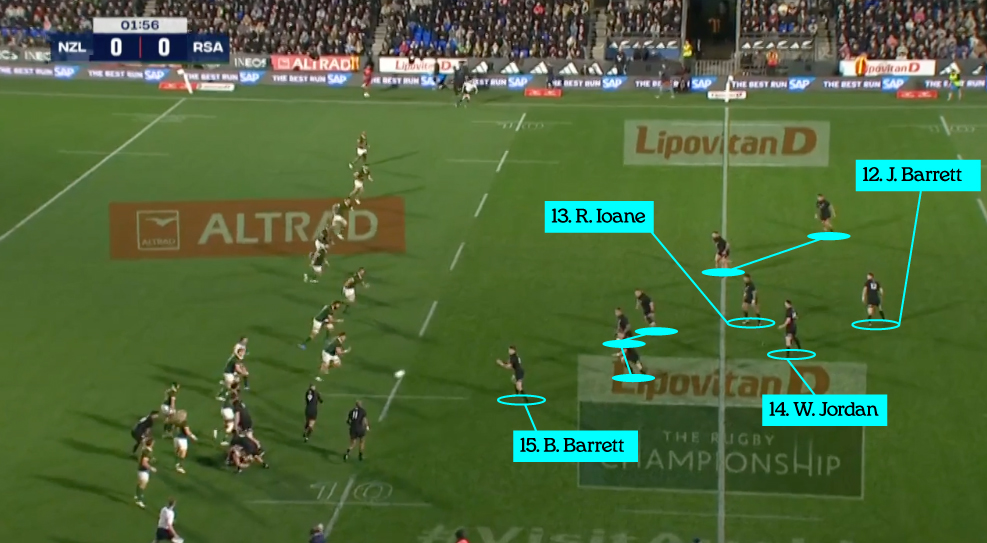
The other big shift has come in the All Blacks backline where they’ve managed to accommodate Jordi Barrett at #12 with Richie Mo’unga and Beauden Barrett at #10 and #15. This gives them three top-class kicking options. Of their 27 in-play kicks against the Springboks, Beauden Barrett had 12, Richie Mo’unga had 8 and Jordi Barrett had 3, with Will Jordan (1) and Aaron Smith (3) rounding out their numbers.
When they combined it on-field against the Springboks, the results were really, really good.
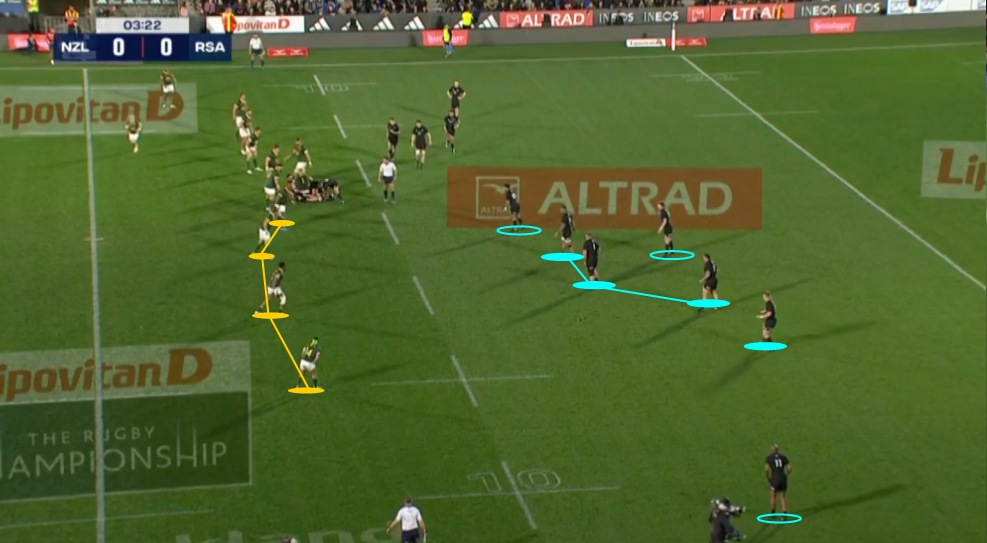
Here’s a typical counter-transition starter play from inside their own 22. Barrett exits really well into the Springbok half hitting the 5m tram line.
This allows his transition defence – lead by Savea on the blindside and Frizzel on the openside – to beat the Springboks to the transition defence line.

Wiese makes a good carry here but it’s almost too good. The intensity of New Zealand’s transition defence forces a huge collision which knocks the ball loose. A slightly less explosive return might have given him a little more control. Either way, the All Blacks just turned possession in their 22 into a set piece just outside their own 10m line with one long kick and a two-man tackle.
Off the resulting scrum, New Zealand use Jordi Barrett to pin the ball deep into the Springbok 22 which Le Roux duly exits to touch.
But watch what happens;

The Springbok defensive line has been pulled completely out of shape by Jordi Barrett’s left-footed kick and Le Roux’s GET IT OFF THE FIELD exit played right into the All Blacks’ hands. Jordan took a quick lineout from Mo’unga, beat the lone chaser and was off into broken field.
From the resulting ruck, the All Blacks were able to surge through a scattered Springbok defensive line and made decent ground before turning the ball over.
That first pod off the ruck hit the line off #10 to ensure the ball hit the space where the Bok forwards would be most disrupted by the transition.
Even with a slowish ruck recycle, the All Blacks beat the Springboks to the structure and hurt them directly off the ruck.
If I palette-switched the black jerseys into Irish green 0n those two GIFs, you probably couldn’t tell the difference in play in this sequence.
A few minutes later, they exited from their 22 from the pocket, with mid-range distance but this time at a contestable height right into the pocket behind the Springbok blitz.

The All Blacks looked for a clean break straight off the catch before settling into post-transition phases. The Springboks were a little slow across the back of the ruck so Smith sensed an opportunity for something more. The key to counter-transition is efficiency – you only take on the opposition phase for phase when they’re off balance. When they regain shape, you kick to start off the process again.
Smith and Mo’unga play a little looser on this compared to Gibson Park and Sexton but you can see why on this GIF. Look at the overload the All Blacks have on the openside just two rucks after the kick.

They have the players in place to play a few extra rucks here and see how it plays out against a Springbok defence that’s looking, at once, both slow and lightweight.
Why wouldn’t you play this? The Springbok ruck guard is Frans Malherbe who looked especially laboured in this game so the All Blacks would have time, space and structure to work with.
After the break, the All Blacks have a compressed Springbok defence to work with and players with the skill set to play around the classic Neinaber edge blitz from Mapimpi.
This was a try created with counter-transition concepts.
But they didn’t end there.
Look at the kick distance, look at the swivel plays from the forwards to open up kicking lanes, look at the kicking to generate momentum.


The Springboks couldn’t catch their breath and their size advantage in the pack counted for very little because they never got a chance to engage with the All Blacks on their own terms.
This strike off the set piece is a good example of crystal clear counter-transition concepts.
Smith hits Savea off the break and sets up a centre-field ruck to split the Bok defence and level out their backfield. The All Blacks immediately use a counter-transition starter kick from Mo’unga into a zone where the Boks have to cluster out of position.

When Telea forces an error out of Kolbe and Le Roux – one of a few from both – the All Blacks just kept unbalancing them. Barrett kicked crossfield off the next ruck which dragged the Boks out of shape again and, from there, we saw some of the special All Blacks flavour on this concept – their quality close in handling at speed. When the ball came back across the field they had the skills to take advantage of a South African blitz that wasn’t constrained by a ruck.

The All Blacks had the Boks completely scattered on these sequences and doubled down again after the line break with another kick, this time behind the Bok blitz.
Barrett and Mo’unga are really good at mixing up shallow position – close to the blitz – and deep position outside the blitz to manipulate the opposition’s line speed against itself.

On the next ruck, Will Jordan swung across from the opposite wing – looping wingers is another constant in Counter-Transition – and opened up a seam from which the All Blacks scored a killer try. Game over.

Jordan’s pass is outstanding here – genuinely world-class – as is the finish but the spacing was opened up by using counter-transition concepts to unbalance and warp the Springbok primary defensive line AND backfield.
They have learned the build mistakes of last season and seem to have their backline more or less sorted when it comes to utilising counter-transition in tandem with their natural skillset.
The All Blacks aren’t back – not yet – but on the evidence of what we’ve seen so far they’ve finally nailed down counter-transition and it seems like a natural fit for them.
That alone is cause for concern for the rest of us.